 or
or  button, respectively, is the equivalent of choosing the Edit
URL... command.
button, respectively, is the equivalent of choosing the Edit
URL... command. button, HoTMetaL will insert a BLOCKQUOTE element
after the P.
button, HoTMetaL will insert a BLOCKQUOTE element
after the P.HoTMetaL essentially lets you do two things: edit the content and edit the markup. The content is just the text of the document. In an electronic document, markup is special codes inside the document that indicate how parts of the file should be processed. For example, a file created with a word-processor or desktop publisher contains markup indicating typographical features such as the font and font size. In an HTML file, which is what HoTMetaL creates, the markup consists of elements. Elements usually consist of a start-tag at the beginning of a section of the text, and an end-tag at the end of that section of text. Marking up a file in HTML mostly means surrounding the text with the appropriate elements. (In addition, there are a few elements that have special functions, such as specifying the location of an image.)
You can think of the elements in an HTML file in (at least) two different ways: you can think of them as formatting styles, or as structural elements. Since a document published on the Web will be formatted differently by each browser or other application that reads it, you may prefer to think of the elements as standing for parts of the document's structure-heading, paragraph, list item-without thinking explicitly about how they're formatted. On the other hand, if you are experienced in word-processing or desktop publishing, you may find it more useful to think of the elements as styles.
HoTMetaL supports both approaches to HTML markup. The commands in the Markup menu are oriented toward thinking of elements as structural objects; the buttons in the toolbars treat the elements like styles. This doesn't mean that you should stick to one or the other set of tools: it's better to understand both and use the one best suited to the task at hand. We'll explain more about this below.
The elements in HTML documents must be arranged according to certain rules: otherwise, the document is considered invalid. When you are using HoTMetaL, you don't have to keep track of these rules yourself-HoTMetaL does it for you. One of HoTMetaL's most important features is automatic rules checking, which ensures that you do not violate the required structure as you are creating a document. As well, when you open or save a document, HoTMetaL checks that the markup is correct and complete.
Many HTML browsers have permitted a very loose, unstructured document format. However, this provides no guarantee that documents will be formatted the way you want when they are displayed on the Web. For this reason, and because there is an emerging trend toward browsers that expect a stricter document structure, we believe that you will find it to your advantage to create all your new HTML documents with HoTMetaL's default rules in force. It will also be worthwhile to modify existing documents to conform to these rules.
The document-structuring rules built in to HoTMetaL are designed to be flexible while at the same time maintaining a useful document structure. If an existing `legacy' document does not conform to these rules, HoTMetaL's Open... command will attempt to open it anyway, adjusting the markup so that it conforms as closely as possible to the HTML rules. If there are serious errors, the document is opened as a text document and can be edited `by hand'. Once the errors are fixed, you can use the Interpret Document command to do the equivalent of Open... on the text file.
One of HoTMetaL's most important features is that it can prevent you from creating invalid HTML markup: rules checking prevents markup errors as you're editing, and validation ensures that the markup is correct and complete.
The Turn Rules Checking On/Off command in the Special menu toggles the state of rules checking in HoTMetaL. The current rules checking state is displayed in the lower right corner of the HoTMetaL window.
Normally you should work with rules checking turned on. When rules checking is on, HoTMetaL ensures that the document being edited will be correctly marked up-only elements that are allowed at a particular point can be inserted. While this checking is not complete, it will nevertheless catch and prevent most markup errors.
There are occasions when rules checking can get in the way of the job at hand. Most commonly this happens when the operation that you are performing involves two or more steps, and one of those intermediate steps will leave the document temporarily incorrectly marked up. For this reason, leave rules checking off only as long as you need to.
You should not turn rules checking off whenever HoTMetaL prevents you from inserting something. The HTML rules are flexible enough that you can generally achieve the effect you want without violating the rules. For example, a list cannot be inserted inside a paragraph, but you can split the paragraph into two paragraphs and insert the list between them. If you create a document with rules checking turned off, you may have a problem opening it again with HoTMetaL, and furthermore a browser may not display the file as you had intended.
HoTMetaL prevents markup errors in a number of ways.
When the rules are not being checked, the commands that were previously disabled will usually become enabled; for the exceptions, see the documentation on the individual commands. This means that you will be able to create an incorrectly tagged document, and therefore you should leave the rules off only as long as you need to.
When you choose Turn Rules Checking On from the menu, the menu item changes to Turn Rules Checking Off to indicate that this state can be toggled. When you turn rules checking back on, HoTMetaL will quickly scan your document to make sure it is correctly tagged. If it isn't, HoTMetaL will present a warning describing the problem, and the insertion point will move to the location of the error. Rules checking will remain off. Select Turn Rules Checking On again after the problem has been corrected.
Choose Validate Document in the Special menu to verify that the markup in a document is correct and complete.
If the validation process finds an error in the document, you will be notified of the error and the insertion point will move to the place where the error occurred.
The purpose of the Validate Document command is to catch and report any markup errors not found by the rules checking. It will check that:
If your document contains Netscape or HTML 3.0 elements or attributes, this will not prevent the document from validating, but HoTMetaL will inform you that the document contains non-HTML 2.0 features. Click on [More...] if you want more information.
If your document contains a selection, the menu item will read Validate Selection. In this case, only the selection will be validated.
HoTMetaL has two toolbars for creating elements. The `Common HTML' toolbar contains buttons for creating the most common HTML elements. This toolbar is the middle one in the default screen configuration. The `Other HTML' toolbar (the bottom one in the default configuration) has buttons for the less commonly used HTML elements.
Most of the buttons in these toolbars represent a single element: to create an element, just click on the button. There are also six buttons that represent a group of related elements. These consist of an icon with a downward-pointing arrow at the right. Clicking on one of these buttons while keeping the mouse button down will bring up a menu of elements that you can choose from. A single, quick click on one of these buttons will cause its default element to be created. The default is the element that was most recently chosen from the menu, or the first element in the menu if this button hasn't been used yet in this HoTMetaL session.
Depending on the context, HoTMetaL will do one of the following when you try to create an element from the toolbar:
If there is no valid action that a button can perform at the current location in the document, HoTMetaL will beep if you click on the button.
HoTMetaL uses the following guidelines when determining which action to take; the first valid action from this list is the one that's carried out.
or
button, respectively, is the equivalent of choosing the Edit
URL... command.
button, HoTMetaL will insert a BLOCKQUOTE element
after the P.The differences between using the toolbar buttons to create markup and using the commands from the Markup menu are that these commands:
You can insert an element from the toolbar or by using the Insert Element... command in the Markup menu.
Each of these methods has a dual function: if the document contains a selection (highlighted text or elements) the element you choose will surround the selection; if there is no selection, an empty element will be inserted.
There are also some situations in which HoTMetaL will insert an element automatically (see Automatic insertion).
To insert an element using the toolbar, just place the insertion point or selection in the desired location in the document and click on that element's toolbar button. The element will be inserted (surrounding the selection if there is one) unless this would cause the document to be incorrectly marked up. In that situation, HoTMetaL will change or split the current element, as appropriate, or beep to indicate that no valid action can be carried out. If rules checking is turned off, the insertion will succeed except when you try to surround something with an element (such as IMG) that can never have content.
When you choose the Insert Element... command, click on the
 toolbar button, or type
Ctrl+I,
you get the Insert Element dialog box, which contains a list of the elements permitted by the
HTML rules at the location of the insertion point (or selection) in the document. The the first element (if there is one) required by the
HTML rules at this point in the document will be followed in the list by the `<' character.
toolbar button, or type
Ctrl+I,
you get the Insert Element dialog box, which contains a list of the elements permitted by the
HTML rules at the location of the insertion point (or selection) in the document. The the first element (if there is one) required by the
HTML rules at this point in the document will be followed in the list by the `<' character.
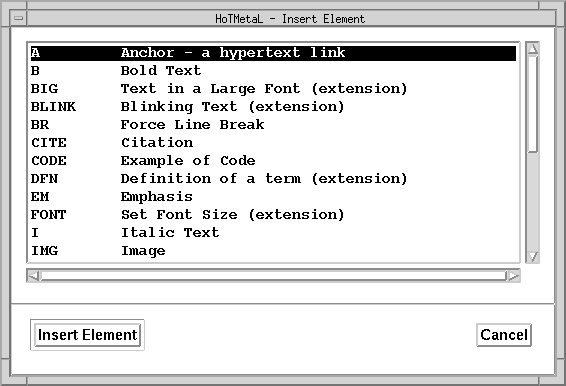
To select an element, click once on the line containing the element name, or type the first character of the element name repeatedly until the correct element is selected. Then click once on the [Insert Element] button to insert it. Alternatively, you can double-click on the line that contains the element name. Since this dialog box displays only the elements that can validly be inserted, the insertion will always take place.
Insert Element... will be disabled and the menu item grayed-out if there are no elements that can be inserted at the insertion point or current selection without creating an incorrectly marked up document. Often the command will become enabled if rules checking is turned off, but there are some elements in which you will never be allowed to insert an element.
There are some circumstances where HoTMetaL will insert an element for you because the HTML rules require it.
You can change the element type from the toolbar or by using the Change... command in the Markup menu.
To change an element using the toolbar, place the insertion point or selection in the element you want to change (the element must be the current
element, the innermost element containing the insertion point or selection.
Then click on the toolbar button for the element you want to change it to. Remember that when you use the
toolbar, HoTMetaL will first try to insert the element you click on, and it will change the current element type only if the insertion
would be invalid. For example, if the current element is P and you click on the
toolbar
button for EM, HoTMetaL will insert an EM, but if you click on the  (address) button , the P will change to ADDRESS.
If rules checking is turned off, clicking on a toolbar button will almost always cause HoTMetaL to perform an insertion, rather than a change. The exception is when the current element is one that cannot have any content (for example, IMG).
When you choose the Change... command (or type Ctrl+L), HoTMetaL gives you a dialog box containing a list of elements that can replace the current element and still leave the document correctly marked up.
To select an element, click once on the line containing the element name, or type the first character of the element name repeatedly until the correct element is selected. Then click once on the [Change] button to insert it. Alternatively, you can double-click on the line that contains the element name. Since this dialog box displays only the elements that can validly substitute for the current element, the change operation will always take place.
The command will be disabled and the menu item grayed-out if there are no elements that can replace the current element without creating an incorrectly marked up document. Often the command will become enabled if rules checking is turned off, but if the current element has any content you cannot change it to an element that can never have content.
Splitting an element literally means breaking it into two elements at the current insertion point or selection. This creates two elements of the same type as the current element, one containing all of the content before the beginning of the insertion point or selection and the other containing the remaining content.
If the insertion point is directly before an end-tag (for example, when you are typing at the end of a paragraph) then splitting creates a new, empty element with the same type as the current element. In fact, the most common use for splitting is to start a new paragraph.
Typing Return or Enter inside most elements will cause them to be split. The exceptions are elements for which you've set the fill mode to `no fill' with the Styles... command-line endings are significant for these elements (e.g., PRE).
You can also split an element by choosing the Split Element command in the Markup menu, or by typing Ctrl+P. This will split the element regardless of its fill mode.
If rules checking is turned on, you can't split an element if this would cause the document to be invalid (for example, you cannot split the HEAD element). You can split any element if rules checking is turned off.
When you split an element that has attributes, both of the resulting elements will adopt the attributes of the original element.
HoTMetaL lets you join the current element and the preceding element, provided they are of the same type-two paragraphs, for example, or two list items.
You cannot join two elements if there is any text other than `white space' (spaces, tabs or carriage returns) between the two them. (Any white space between the elements will be condensed to a single blank space if the join operation succeeds.)
If the elements have attributes, then the attributes of the first element will be adopted for the new, combined element.
Choosing Remove Tags from the Markup menu, clicking on the
 toolbar button, or typing
Ctrl+D at the keyboard deletes the start- and end-tags of the current element without affecting its contents.
toolbar button, or typing
Ctrl+D at the keyboard deletes the start- and end-tags of the current element without affecting its contents.
The command will be disabled if deleting the tags will leave the document incorrectly marked up. However, it will always be enabled if rules checking is turned off.
If an element has no content, backspacing over its start- or end-tag will delete the element.
Elements can have content (text and sub-elements contained in the element) and attributes. An attribute is a piece of information about the element that does not appear in the content of the element. The most common uses for attributes are:
If the current element has one or more attributes, then the Edit SGML Attributes... command in the Markup menu will be enabled (whether or not the attributes have been given values). To use this command:
The
Edit Attributes dialog box lets you see what the attribute values are and also edit them.
The dialog box contains a line for each attribute of the current element. Each line starts with the attribute name, followed by either a text entry box or an option menu, depending on what kind of value the HTML rules say the attribute must have. The attribute value may be text or a choice from a list of values. This means that the dialog box will be different for each kind of element.
The list of attributes for the INPUT element shows both possibilities:
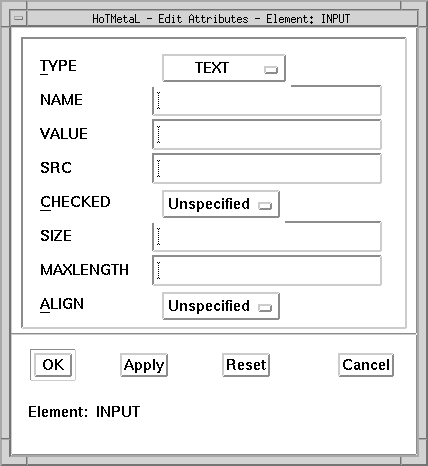
TYPE, CHECKED, and ALIGN are chosen from a list, while the values for the other attributes are typed directly in the corresponding text entry boxes.
There are some attributes that you should not edit with this command. In particular:
You can insert HTML comments in your document by choosing the
Insert Comment command in the Markup menu, typing
Ctrl+' (the
Ctrl
key and an apostrophe), or clicking on the
 toolbar button. Comments, which can contain only text, are notes that are visible when you display the document in
HoTMetaL but are not displayed by browsers.
toolbar button. Comments, which can contain only text, are notes that are visible when you display the document in
HoTMetaL but are not displayed by browsers.
Note: Because of the way comments are represented in HTML, you should not put two hyphens in a row, `--', inside a comment. This could cause the markup to be invalid.